
The previous article covered process fundamentals and sourcing parameters. This one addresses two more visible issues: how to identify and trace the most frequent production defects, and how to choose among a wall of material grades. The content is geared toward acceptance and selection in practice, and works as internal SOP for a purchasing or quality team.
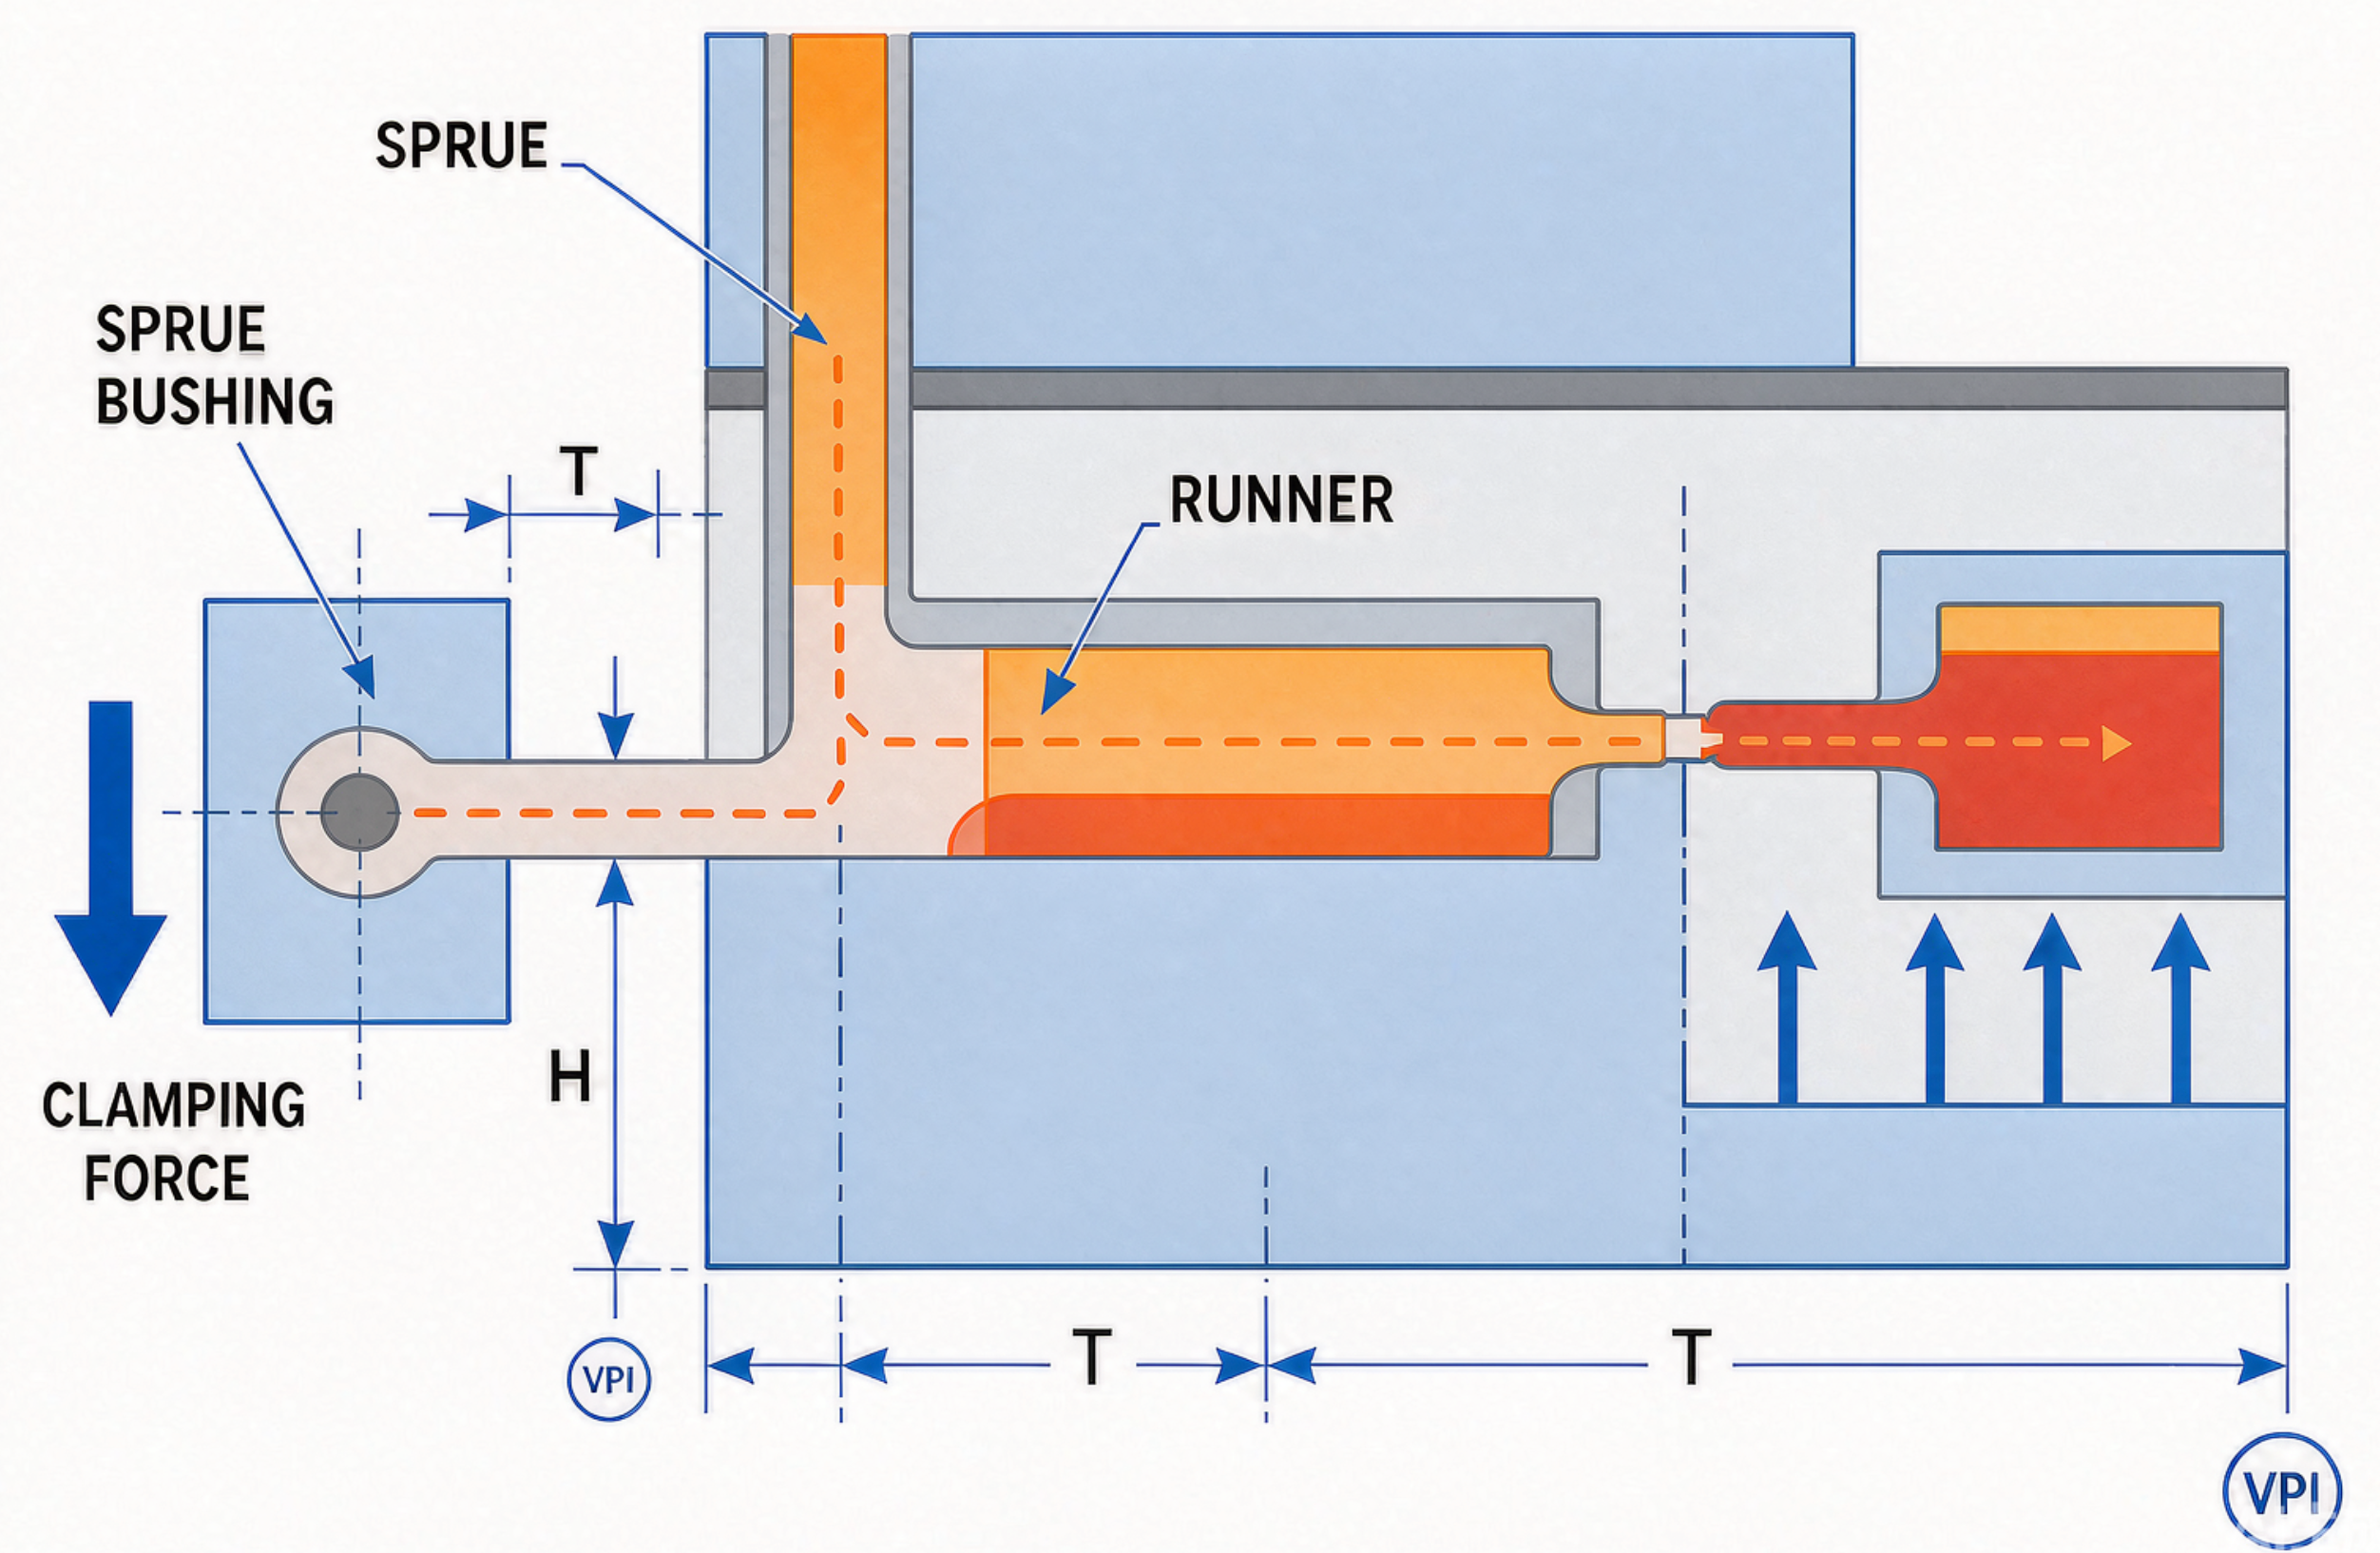
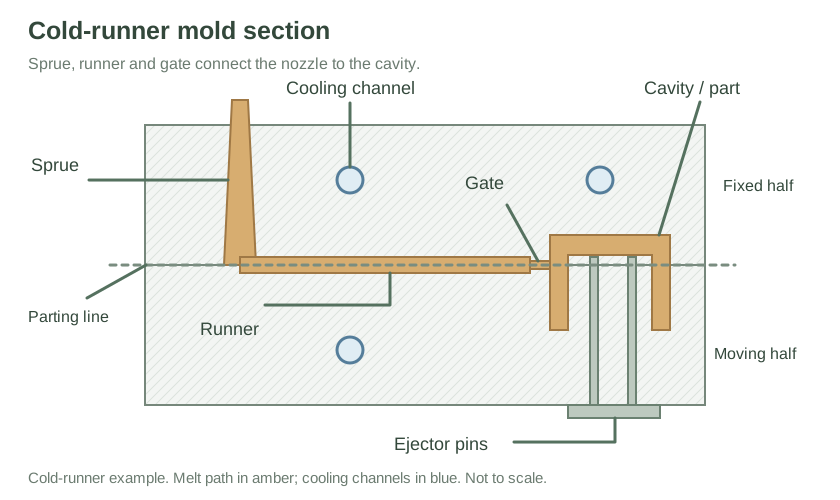
Understanding this gating-system cross-section helps trace defect causes: melt travels from the nozzle through the sprue → runner → gate into the cavity. Flow marks, gas traps, and short shots are usually traceable somewhere along this path. The gate location and size also decide weld-line position and packing pressure—two of the most common appearance and strength issues.
1. Common Defects at a Glance
|
Defect |
Symptom |
Main cause |
Countermeasure the buyer can request |
|
Short shot |
Cavity unfilled, local missing |
Insufficient shot/pressure, poor flow, poor venting |
Raise injection pressure, optimize gate, improve venting; confirm fill at sampling |
|
Flash |
Thin fin at parting line or ejector |
Low clamp force, mold gap, high melt temp |
Verify tonnage, repair mold, lower melt temp; require de-flashing |
|
Sink mark |
Surface depression at thick section |
Insufficient holding, local thick wall, high shrinkage |
Thin the structure, strengthen holding; avoid thick walls in DFMA |
|
Warpage |
Part distorts, not flat |
Uneven shrinkage, uneven cooling, glass-fiber orientation |
Optimize cooling lines, adjust process; use fixture if needed |
|
Flow mark / silver streak |
Surface streaks, silver lines |
Wet material, trapped gas, fast gate |
Dry material thoroughly, improve venting, slow fill |
|
Burn mark |
Local blackening, odor |
Trapped gas, too-fast injection |
Add vent slots, lower injection speed |
|
Weld line |
Visible seam where flows meet |
Two melt fronts meet, low temp/pressure |
Raise melt temp, add overflow, reposition gate |
|
Jetting |
Snaking, uneven fill at gate |
Melt injected too fast, no restriction |
Use pin or fan gate, slow initial fill |
|
Delamination |
Layered, peeling surface |
Material incompatibility, contamination |
Verify material, clean barrel, no mixed resins |
|
Discoloration |
Off-color, yellowing |
Overheating, degraded material, contamination |
Lower barrel temp, check residence time |
Acceptance tip: Grade cosmetic parts as A/B/C surfaces (A-surface: no visible defects; C-surface: relaxed), and treat structural parts’ assembly dimensions and strength as hard limits. A defect that is cosmetic on a C-surface may be a reject on an A-surface, so the grading rule must be agreed before production, not argued after.
2. Commodity Plastics vs. Engineering Plastics
Choose the wrong material and no process can save it later. The table maps common purchasing scenarios:
|
Category |
Representative grade |
Key properties |
Typical use |
Buyer caution |
|
Commodity PP |
Homopolymer / copolymer PP |
Light, chemical-resistant, cheap, easy to mold |
Containers, appliance housings, auto interior |
Brittle in cold; confirm impact modification or talc fill |
|
Commodity ABS |
Chi Mei PA series etc. |
Rigid, paintable, dimensionally stable |
Electronics housings, toys, auto parts |
Moderate heat (≈80–100°C); avoid for high-temp |
|
Engineering PC |
PC-110 etc. |
High clarity, impact, decent heat |
Lenses, transparent covers, electrical |
Stress cracks; control molding stress and torque |
|
Engineering PA (Nylon) |
PA6 / PA66 |
Wear-resistant, strong, heat-resistant |
Gears, bearings, structural |
Hygroscopic; confirm conditioning and size stability |
|
PC/ABS alloy |
— |
Toughness + paintability |
Thin-wall housings, auto interior |
Ratio affects properties; lock the grade |
|
Filled material |
PA+GF, PBT+GF |
High strength/rigidity, stable size |
Load-bearing structural |
Fiber content affects surface bloom and mold wear |
|
POM (Acetal) |
— |
Low friction, high stiffness, dimensional stable |
Gears, clips, precise mechanisms |
Sensitive to acid; confirm environment |
|
PBT |
— |
Good electrical, heat, chemical resistance |
Connectors, bobbins, auto |
Often supplied glass-filled; check warp |
|
TPE / TPV |
— |
Rubber-like, overmoldable |
Soft grips, seals, gaskets |
Bonding to substrate needs correct pair |
Selection logic: First set the four constraints—load, heat, appearance, cost—then work backward to the material. Don’t jump to the most expensive engineering plastic; many structural parts are satisfied by modified PP, at a cost difference of several times. For high-heat or chemical-exposed parts, move up to PA, PBT, or PPS; for clarity plus impact, PC or PC/blends; for moving precision parts, POM. Always confirm the grade with a data sheet, not just a family name.
3. Buyer Acceptance Checklist
- First-article full-dimensional report: Measure every critical dimension against the drawing, with the actual measured value and the tolerance band.
- Batch sampling plan: Agree on AQL level and inspection frequency—don’t inspect first piece only. A common scheme is AQL 1.0 for critical, 2.5 for major, 4.0 for minor, but set it explicitly.
- Material traceability: Keep grade labels/certificates on incoming; sample-check when needed. For regulated markets, require RoHS/REACH declarations.
- Defect grading standard: Align A/B/C surface rules with the supplier up front to avoid subjective disputes at the dock.
- Tool & process baseline: Lock the process window (melt temp, injection pressure, hold time, cycle) at the qualified first article as the consistency benchmark for future batches.
- Non-conformance flow: Define in the contract what happens to a rejected batch—rework, replacement, or credit—and who pays freight both ways.
Bring the supplier in early. The cheapest defect is the one designed out. A design-for-manufacture (DFM) review before tooling—checking wall-thickness uniformity, draft angles, gate access, and ejector placement—typically removes 60–80% of downstream issues. Many buyers skip this to save a few days and pay for it across several sampling loops. A 30-minute DFM call is cheaper than one mold revision.
4. How to Read a Material Data Sheet
A data sheet is your cheapest insurance against substitution. Three numbers matter most: melt flow index (MFI) tells you if the grade fills your wall thickness; shrinkage rate drives your tool dimensions (and differs by flow direction for filled grades); heat-deflection temperature (HDT) tells you the real service-temperature ceiling, not the marketing “heat resistant.” Compare the supplier’s quoted grade against the OEM data sheet before tooling, and keep a copy on file for incoming audits.
5. Troubleshooting Workflow When a Defect Appears
When a defect shows up, resist the reflex to blame the operator. A disciplined sequence saves time:
- Contain and document: Quarantine the batch, photograph the defect, and note which cavity/cavity position it came from (a defect in one cavity points to that cavity, not the whole tool).
- Compare to baseline: Pull the approved first-article process sheet and compare melt temp, pressure, hold, and cycle. Most drift starts here.
- Isolate the variable: Change one factor at a time—material lot, machine, or process—rather than several at once, or you won’t know what fixed it.
- Confirm at the root, not the symptom: A sink mark may “disappear” with more pack pressure, but the real fix is often a thinner wall in the next design revision. Record both the band-aid and the root cause.
6. A Short Material-Selection Example
Suppose you need a 120 mm cover clip that must hold a 2 kg load at 80°C and look clean on the outside. Walking the constraints: load + heat rules out commodity PP and ABS (ABS softens near 80–100°C); appearance rules out filled grades with surface bloom; that leaves PA6 (strong, heat-capable) or PC/ABS (tough, paintable). If the clip sees repeated flexing, PA6 with a small glass fill wins; if it must bond to a painted shell, PC/ABS is easier to finish. The point is not the answer—it is that the answer falls out of the constraints, not the catalog.
Conclusion
Defects and material selection are fundamentally “front-end definition” problems: most defects surface at sampling and DFMA, and material selection follows once design constraints are clear. Fold the tables and checklists here into your review and acceptance flow to measurably cut incoming-defect rate and rework cost.
(This is Part 2 of the injection-molding series; Part 1 is Injection Molding Process & OEM Sourcing Guide.)


1 comment
zanini
Solid breakdown! Hit the nail on the head with the material selection bit—people love jumping straight to pricey engineering resins when modified PP would’ve done the trick for half the cost. The troubleshooting workflow is absolute gold too. Thanks for putting this together!